Autpilot button example
The easiest setup to get you started is getting a pushbutton to interact with MFS2020. In this example, we'll explain everything you need to create your first project.
What you’ll need
- A microcontroller (Arduino, ESP, Teensy, etc.).
- A pushbutton.
- 2 Wires (preferably 1 black and 1 colored).
- A breadboard
Other components will work as well so feel free to experiment to your hearts desire
Wiring the components
There are multiple ways to connect the pushbutton to a microcontroller. We’ll teach you the easiest way, which utilizes the microcontroller's built-in pullup resistors.
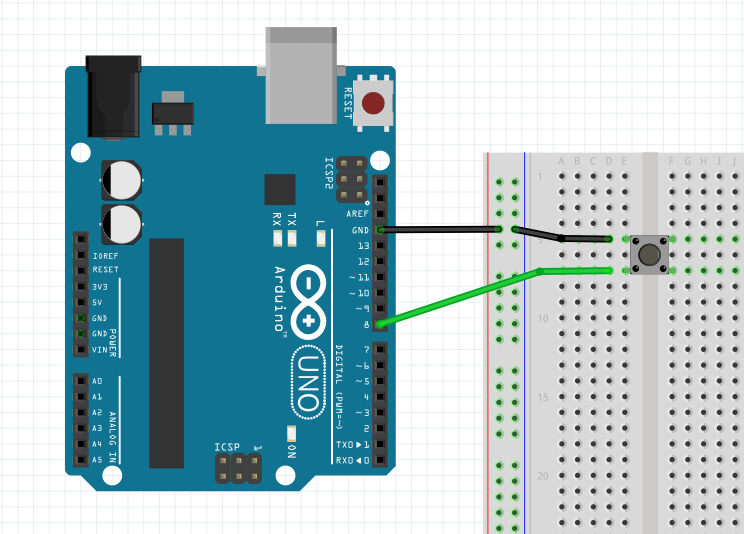
First place the pushbutton in the middle of the breadboard so it bridges the gap in the middle. Now connect one of the wires to the ground connection on your controller and the other end to the top leg of the button (see the image below). The next step will be to connect the other leg of the button to pin 8 on your controller (you can change the pin as long as you alter the code as well).
Writing the firmware
We need to write a small bit of code to make the controller interact with the button. Remember to make any changes if you’ve decided to connect the button to another pin.
// This is needed when using another IDE than the Arduino IDE
#include <Arduino.h>
#include <BitsAndDroidsFlightConnector.h>
// Connect the button to pin 8
#define APBTNPIN 8

// Create a connector instance
auto connector = BitsAndDroidsFlightConnector();
// To check against if the state changed
int old_btn_state = HIGH;

void setup() {
  // Start serial coms at a rate of 115200 (this can be changed later)
  Serial.begin(115200);
  // Enable the internal pullup resistors
  pinMode(APBTNPIN, INPUT_PULLUP);
}

void loop() {
  const int btn_state = digitalRead(APBTNPIN);
  // To avoid unnescesary triggers
  if (old_btn_state != btn_state){
    if(btn_state == LOW){
      // A  full list of commands can be found in the inputs chapter
      connector.send(sendApMasterOn);
    }
    old_btn_state = btn_state;
    // Add a delay to debounce noise
    delay(200);
  }
}